The bathroom mirror is an essential item in daily life, and its installation quality directly affects both usability and the overall aesthetics of the bathroom. Many beginners hesitate to install it themselves, fearing complex operations or damage to walls or the mirror. However, with this step-by-step guide, even those with no prior experience can finish the installation in 1-2 hours, achieving both "accurate positioning" and "stable fixation".
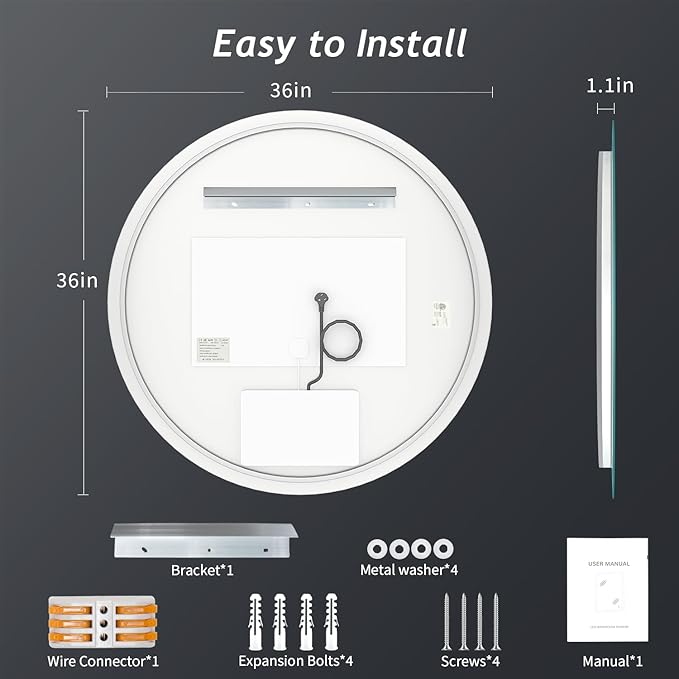
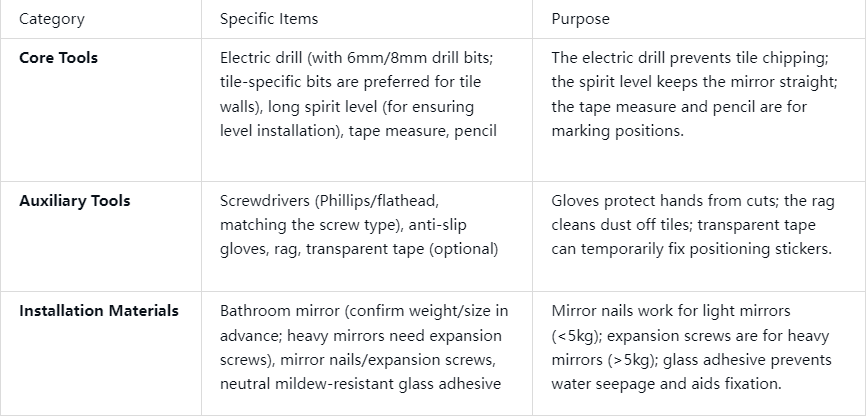
Preparations: Tools & Materials You’ll Need.Before starting, gather all necessary tools and materials to avoid interruptions during installation.
Step 1: Determine the Right Installation Height
Standard Height: The center of the mirror should align with the eye level of an average adult. For people 160-180cm tall, the mirror’s center should be 150-160cm above the ground.
Special Adjustments: If there are children at home, lower the height by 5-10cm. For mirrors with storage shelves, reserve space equal to the shelf height (e.g., a 10cm-tall shelf requires 10cm between the mirror’s bottom and the countertop).
Mark a Reference Line: Use a tape measure to confirm the height, then place the spirit level against the wall. Draw a short horizontal line along the level’s edge with a pencil as a reference.
Step 2: Accurately Mark Screw Hole Positions
Use Positioning Stickers: If the mirror comes with pre-cut positioning stickers, stick them to the back of the mirror, aligning with its edges.
Manual Marking (No Stickers): Measure the distance from the mirror’s corners/fixation points to its edges (e.g., 3cm from the left edge and 3cm from the top edge for the top-left corner). Mark these positions on the wall.
Key Tip: Use the spirit level to check that the marks are horizontal (left-right) and vertical (up-down). Never mark holes on tile joints—joints are hollow, which can cause tiles to crack and screws to loosen.
Step 3: Drill Holes Without Chipping Tiles
Drill Bit Selection: For tile + concrete walls, first use a tile-specific drill bit (with alloy teeth) to penetrate the tile, then switch to a regular concrete bit to drill deeper into the wall. For wooden or gypsum board walls, use self-tapping screws directly (no drilling needed).
Hole Depth: Drill 5mm deeper than the length of the screw/expansion tube (e.g., drill 3.5cm deep for a 3cm-long screw). Keep the drill perpendicular to the wall to avoid offset holes.
Clean Up: Wipe dust off the tiles with a rag, and blow out debris from the holes (with your mouth or a hair dryer) to ensure screws fit smoothly.
Step 4: Install Expansion Tubes (Must for Heavy Mirrors)
Heavy Mirrors (>5kg): Insert expansion tubes (matching the hole size, e.g., 6mm tubes for 6mm holes) into the holes. Tap them gently with a hammer until they are flush with the wall (no protrusion).
Light Mirrors (<5kg): Self-tapping screws can be used directly, but expansion tubes are still recommended—they prevent screws from rusting and loosening in the humid bathroom environment.
Step 5: Fix the Mirror (Two People for Stability)
Temporary Fixation: One person holds the mirror, aligning its holes with the wall holes. The other uses transparent tape to stick the mirror’s top and bottom edges to the wall (freeing hands for screwing).
Screw in Order: First tighten the top two screws (to prevent the mirror from sliding down), then the bottom two. Leave a 1mm gap for final leveling.
Level Adjustment: Place the spirit level on top of the mirror. If the bubble is off-center, gently adjust the mirror’s edge until it’s level. Then fully tighten the screws—stop when the mirror is secure (over-tightening may crack the mirror).
Step 6: Apply Glass Adhesive to Prevent Water Seepage
Adhesive Choice: Use neutral mildew-resistant glass adhesive—acidic adhesive has a strong odor and corrodes metal parts.
Application Method: Apply a 5mm-wide, even bead of adhesive along the gaps between the mirror’s bottom, left, and right edges and the wall. Do NOT apply adhesive to the top edge (trapped hot air can cause fogging or mildew on the mirror’s back).
Finish Up: Smooth the adhesive with your finger or a scraper, wipe off excess adhesive with a damp rag, and let it dry for 24 hours before using the mirror.
3 Critical Mistakes to Avoid
Ignoring Wall Load-Bearing: Hollow bricks or lightweight walls cannot support mirrors over 8kg (risk of wall cracking or mirror falling). Use suction-cup mirrors (no drilling needed) for these walls.
Using the Wrong Screws: In humid bathrooms, iron screws rust easily. Always use stainless steel screws, and choose mirror nails with waterproof coatings (e.g., chrome-plated or zinc-plated).
Sealing All Edges with Adhesive: As mentioned, skip the top edge—this allows hot air to escape, preventing mildew.
By following these 6 steps, beginners can install a bathroom mirror that is level, stable, and waterproof. Simply check the screws every 6 months for tightness, and the mirror will last 5-10 years. This guide not only saves on professional installation costs but also makes DIY home improvement easy!
Post time: Sep-29-2025


